In Gig Performer, a "Rig" is a collection of three sets of information: a set of physical MIDI controllers, a set of virtual controllers that can be attached to widgets, and a map that relates the two sets, thereby connecting your physical controller, through widgets, to parameter controls.
A MIDI Input Device is a physical controller, which may include a keyboard, multiple knobs, sliders, buttons, or other individual controllers. It the device does not include a keyboard, it is normally referred to as a control surface. In the Rig Manager you define an alias for a MIDI device.
Aliases can also be set to MIDI Controls and they represent the virtual controllers that get mapped to parameters.
Once the lists of MIDI Device Aliases and MIDI Control Aliases are established, they appear as drop-down menus in fields where they are used, for example, as MIDI sources in plugins (see the How to use aliases chapter for more).
The Rig Manager is designed to speed your workflow by eliminating the need to teach controllers to Gig Performer every time you use a different keyboard or controller setup (provided that you created aliases and saved your setup). Note: when you use a completely new MIDI device, you will need to map aliases to the desired controllers, but only once, since you can save them. Afterward, simply switch between the saved rigs.
The Rig Manager constructs a map of physical input devices like keyboards, and the controllers they host, like sliders, buttons, faders, and knobs, to aliases (virtual controllers) that are linked to widgets. Virtual controllers decouple the physical controller from the control paths in Gig Performer, which makes it easier to swap out different physical controllers while maintaining your usual controls.
Say, for example, that you're sharing backline instruments with another performer and so have to use someone else's keyboard controller for your performance. The Rig Manager's controller mapping means that you only need to map the new physical controllers to the existing virtual ones and all of your widget controls are reestablished. This can be accomplished in a few minutes, even when you're at soundcheck. As an aside, this is a feature that was implemented after one of the developers was on tour and ran into the problem when he had to use a different controller than normal.
Similarly, if you use one controller for rehearsal and a different one for gigs, the Rig Manager can make it much easier to switch between them.
Also, if you play multiple identical keyboards, the Rig Manager can be used to let you quickly designate which keyboard is which. For example, one of the developers who often uses three identical controllers named them Top, Middle and Bottom in the Rig Manager. When the key-boards are plugged in, he can quickly visit the Rig Manager, play a note on each of these key-boards so as to tell the Rig Manager which one is now Top, Middle or Bottom.
The Rig Manager window is displayed in the screenshot below:
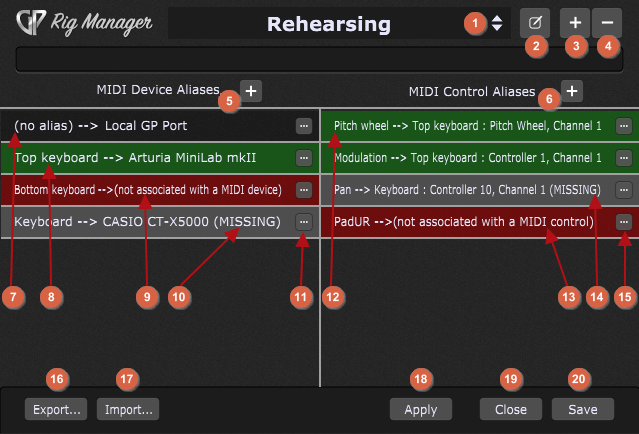
1.Rig list - clicking this drops down a menu of currently available rigs. Choose one from the list.
2.Rename this rig - click this to customize the name of the current rig.
3.Add a new rig - click this button to open a menu that allows you to duplicate the rig (the Duplicate current Rig option) or add a new one (the Add new Rig option). The difference between creating a new rig and duplicating the current rig can be seen in the left side of the Rig manager - MIDI Device Aliases; when a new rig is created, aliases are not associated with MIDI devices and when the current rig is duplicated - aliases are associated with MIDI devices (the same as in the original rig). Note: MIDI Control aliases are defined globally and are present in newly created rigs.
4.Remove this rig - click this button to remove the current rig. A confirmation dialog offers you the chance to cancel, if you change your mind.
5.Add a new MIDI device alias - click this to add a new MIDI device alias in the list. When you add a new MIDI device alias, it is not associated with a MIDI device (like in (9)). See the point (11) to see how to associate it. After you successfully associate the MIDI device alias with the desired MIDI device, it is highlighted green like in (8).
6.Add a new MIDI control alias - click this to add a new MIDI control alias to the list. When you add a new MIDI control alias, it is not associated with a MIDI control (like in (13)). See the point (15) to see how to associate it. After you successfully associate the MIDI control alias with the desired MIDI control, it is highlighted green like in (12).
7.MIDI Input Device with no defined alias - indicates that Gig Performer recognized this MIDI input device, but no MIDI device alias has been defined for it yet. Gig Performer automatically detects all available MIDI input devices. Note: the Local GP port is a special MIDI device, check the Local GP port chapter to learn more.
8.Associated MIDI Input Device alias - indicates that the MIDI Input Device alias is successfully associated with this MIDI device and that this MIDI device is connected to the computer.
9.Unassociated MIDI Device alias - indicates that the MIDI Device alias is created, but it is not associated with a MIDI device.
10.Missing MIDI device - indicates that this MIDI device is associated with the corresponding alias but is disconnected. Connecting the corresponding MIDI device will change the display green as indicated with (8).
11.Manage this entry button - clicking on this button (or right clicking on any MIDI device alias) opens this menu:
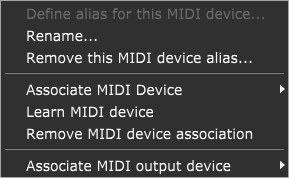
a.Define alias for this MIDI device... - clicking on this menu item opens the Define MIDI device alias dialog which allows you to enter a new alias for the corresponding MIDI device.
b.Rename... - allows you to rename the MIDI device alias.
c.Remove this MIDI device alias... - removes the MIDI device alias. The MIDI device will display "(no alias)" when connected (as shown in (7)).
d.Associate MIDI Device - allows you to manually select a MIDI device from the list and associate it with the MIDI device alias.
e.Learn MIDI device - allows you to quickly assign a MIDI device by simply moving the desired control. The MIDI device alias will be automatically mapped to the detected MIDI device.
f.Remove MIDI device association - clears the MIDI device association for the MIDI device alias.
g.Associate MIDI output device - allows you to select the desired MIDI output device from the list:
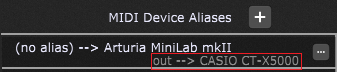
This is used when the Sync option is enabled for a widget in the Widget Properties Inspector that is controlled by an MIDI event from an Input device. The Sync by default goes back to the same MIDI device, which is what you would want in most cases, but sometimes you may want to Sync or "send out" those MIDI messages to a different MIDI device so it can display the values (as indicated with the red rectangle in the screenshot above). Note: this is a widget option and not a a permanent one; if you don't enable the Sync option for a widget then selecting different Out device has zero impact on your setup.
12.Associated MIDI Control alias - green background indicates that the MIDI control alias is associated with the physical MIDI control.
13.Unassociated MIDI Control alias - indicates that the MIDI Control alias is created, but it is not associated with a MIDI control.
14.Missing MIDI device - indicates that this MIDI control is associated with the corresponding alias but the MIDI device that hosts this control is disconnected. Connecting the corresponding MIDI device will change the display green as indicated with (12).
15.Manage this entry button - clicking on this button (or right clicking on any MIDI control alias) opens this menu:
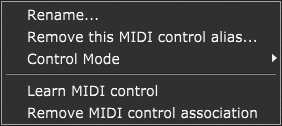
a.Rename... - allows you to change the name of the MIDI control alias.
b.Remove this MIDI control alias... - removing the MIDI control alias also removes this entry from the MIDI Control Aliases list.
c.Control mode - allows you to select between an absolute mode and one of four relative modes:
- Absolute - use this option if you don't have endless encoders (default). An endless encoder doesn't have a "stop" point, so it keeps turning until you stop moving it.
- Relative Offset - positive offsets are sent as offset plus 64 and negative offsets are sent as 64 minus offset. 64 is zero, 65 is +1, 63 is -1.
- Signed 1 Bit - if the most sign bit is set, Then the offset is positive. The lower 6 significant bits are the offset.
- Signed 2 Bit - if the most sign bit is unset, Then the offset is positive. The lower 6 significant bits are the offset.
- Two’s Complement - positive offsets are sent as normal from 1 to 64 and negative offsets are sent as 2s complement negative numbers. This is a signed 7 bit int.
d.Learn MIDI control - allows you to quickly assign the physical control on a MIDI device by simply moving the desired control. The MIDI control alias will be automatically mapped to the detected control.
e.Remove MIDI control association - removes the association with the physical MIDI control.
16.Export... - click on this button to save the state of the rig to a rigsetup file. This file can be moved and imported to a new computer.
17.Import... - click on this button to load an existing rig file. Note: changes will not take effect until you click Apply or Save.
18.Apply - click this button to apply changes you have made.
19.Close - clicking on this button closes the Rig Manager window.
20.Save - click this button to save the state of the rig to the current rig file and close the Rig Manager window.
Note: the Rig Manager associations are not part of the gig file. If you are moving your hardware from one computer to another you should export your rig from the computer where things work and import it on other computers where you plan to use that hardware. Also refer to this chapter if you want to export all options in Gig Performer.