Thank you for your interest in Gig Performer Essentials.
Please enter your name and email address in the field below. Links for both Windows and macOS downloads will be sent to you.
By providing your email address, you will be subscribed to our newsletter from which you will be able to unsubscribe at any time. Make sure you use a valid e-mail address and if you don't receive our e-mail, please check your spam folder.
Dialog window
Gig Performer® 14-Day Free Trial
Thank you for your interest in Gig Performer.
Please enter your name and email address in the field below. Links for both Windows and macOS downloads will be sent to you.
By providing your email address, you will be subscribed to our newsletter from which you will be able to unsubscribe at any time. Make sure you use a valid e-mail address and if you don't receive our e-mail, please check your spam folder.
Audio latency, buffer size and sample rate explained
I hear the term Latency a lot when talking about audio processing. What does it really mean? How do you set your gear and Gig Performer to work for you, not against you? .
What is latency?
. It’s simply the amount of time that passes between the sound being generated and perceived by your brain. Basically – it is a delay.
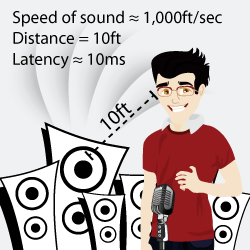
What does it really translate to when playing on stage? Suppose the person on the left is approximately 10ft away from the speakers behind him. The speed of sound is approximately 1,000ft per second which basically means that it takes about 10 milliseconds for sound to travel from the speakers to the person’s ears. The latency here is about 10ms.
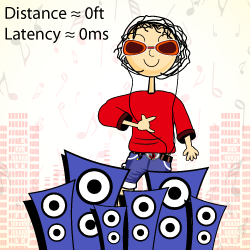
Now consider this guy who is using a pair of in-ear monitors. There is almost no distance between the in-ear monitors and the ear so the latency here is basically non existent. As soon as the sound is produced – the person hears it. Latency is zero milliseconds. .
What are the buffer size and sample rate?
. What is the buffer size? It is basically the maximum number of samples that will be collected before your plugins get to process them. Your audio interface is an analog-to-digital as well as digital-to-analog converter. It takes any audio input, converts that into digital form and then on the output side – converts those numbers back to analog audio.
What is the sample rate? The sample rate determines how many samples your audio interface will capture every second and do the above mentioned conversions. 44.1KHz is a common sampling frequency for live use. Why 44.1KHz?
How does this relate to latency? If your buffer size is 256 and your sampling rate is 44,100 times per second (Hz means cycles per second) then your latency will be (256/44,100) seconds which is 0.0058 seconds or 5.8ms
Now you can experiment with this. What kind of impact will doubling the sample rate have? If you set it to 96KHz you will get 256/96,000 = 2.7ms latency. Basically – the buffer fills up twice as fast. If you change the buffer size to 128 and leave the sampling frequency at 44.1KHz – you will get 2.9ms and so on.
How does this impact your processing power? A smaller latency value simply means that your computer needs to work harder to process all those samples in time. It does not impact the sound quality.
We now come to the perceptions of latency and how to properly adjust these values.
I started with the explanation of the difference in latency between in-ear and floor monitors. I’m a fairly tall person (over 6ft) so for me – the minimum amount of latency with a floor monitor positioned right under my feet will be around 6ms. If I switch to a pair of in-ear monitors – that latency drops to zero. .
What latency can you hear?
. Some people swear that they can hear the difference of 3ms latency. I applaud those people and I believe they can hear some kind of difference. It has been scientifically proven that people can perceive between 3ms-10ms difference. It seems that our brain cannot distinguish anything below 3ms.
I have heard claims that some people can tell the difference in latency of 1.5ms (128 vs. 64 buffer size at 44.1KHz). While I have no doubt that these people can hear “something” – I am having hard time that it is really latency difference they can hear.
Do an experiment. Move away and towards your floor monitor by 3ft and also change the volume on it to eliminate the perception of distance connected with loudness and honestly ask yourself if you can tell the difference in latency. Think about all the players before the in-ear monitors were used on stage? They would move around the stage a lot. Sometimes 6ft from the monitor, sometimes 12ft or more and their playing never felt sluggish or different even with whooping 6ms-12ms latency added.
How about a conductor and players in a full orchestra? The violins are maybe 5-6 feet away from the conductor (5-6ms latency) while the timpani player may be 30ft or more away (30ms latency). How about players on opposite sides of each other in the orchestra?
Do any of the players sound out of time with each other? or does the conductor hear all the notes attacking at different times? .
What latency is acceptable for live use?
. I have to be honest and say that the 6ms difference in latency between a floor monitor and an in-ear monitor does not impact my playing nor perception of things. This is why I personally use a buffer size of 256 and sample rate of 44.1KHz. By the way, we’re talking about live performance here, not recording which should be done slightly differently.
If I cut my sample buffer in half to 128 samples – I would save about 3ms of latency or approximately 3ft of distance between me and my monitor. I honestly cannot feel the difference which means that 256 samples is a better choice for me. There is no point in pushing my computer to work harder than it should if I cannot perceive the difference.
In this YouTube video, Igor Paspalj demonstrates what latency is acceptable for live use.
.
How to measure round-trip latency?
. One addition to all these calculations is the latency induced by your audio interface. Not all audio interfaces are created equally. Some are great and have low internal latency for both A/D and D/A conversions and some are adding a bit more so you’d have to lower you buffer size to get the same result. To find out how much latency is your interface introducing into your rig – use the Gig Performers’ built-in Latency Measurement Tool. Here is a screenshot of it:
Instructions on how to use it are right there within that window. You can find this tool under the “Windows” menu in Gig Performer.
As you can see – this awesome interface is introducing less than 6ms of latency for both A/D and D/A conversion. If you are playing keyboards only – you cut this number in half as you only need the D/A part of the conversion so for this interface it will be less than 1ms. .
What is my plugin’s latency?
. Gig Performer provides a feature that allows you to see how much latency every plugin adds to your setup. Simply hover over your plugin block to show a tooltip and look for the Latency information.
Next time you open your Gig Performer – ask yourself what is the highest possible sample buffer size that works for you on stage. Using higher buffer size will run your computer cooler and allow you to run more great plugins in parallel without pops and crackles.
In conclusion, use the sample rate of 44,100 and the highest buffer size that does not impact your playing performance. Think of it as “headroom” for your processing power. If you have a bit of headroom – you will be able to beef up your gig with more interesting plugins without impacting performance.
We use cookies to ensure that we give you the best experience on our website. If you continue to use this site we will assume that you are happy with it.